GitHub Actions Deployment
1. Fork this repository on GitHub
First, fork this repository to your own GitHub account. The deployment configuration and workflow runs will be done in your forked repository.
2. Prepare Cloudflare credentials
You need to prepare the following two GitHub Actions secrets in Cloudflare:
CLOUDFLARE_ACCOUNT_ID: Your Cloudflare account ID. See Find account and zone IDs - Cloudflare Fundamentals docs for how to find it.CLOUDFLARE_API_TOKEN: A token used by GitHub Actions to call the Cloudflare API. You can create it on the API Tokens | Cloudflare page.
IMPORTANT
The R2 feature must be enabled manually in the Cloudflare dashboard before deployment. If the first workflow run fails because R2 is not enabled yet, enable it and rerun the GitHub Actions workflow.
You only need to enable the R2 feature. You do not need to create the bucket manually. The deployment will create the web-archive bucket automatically.
NOTE
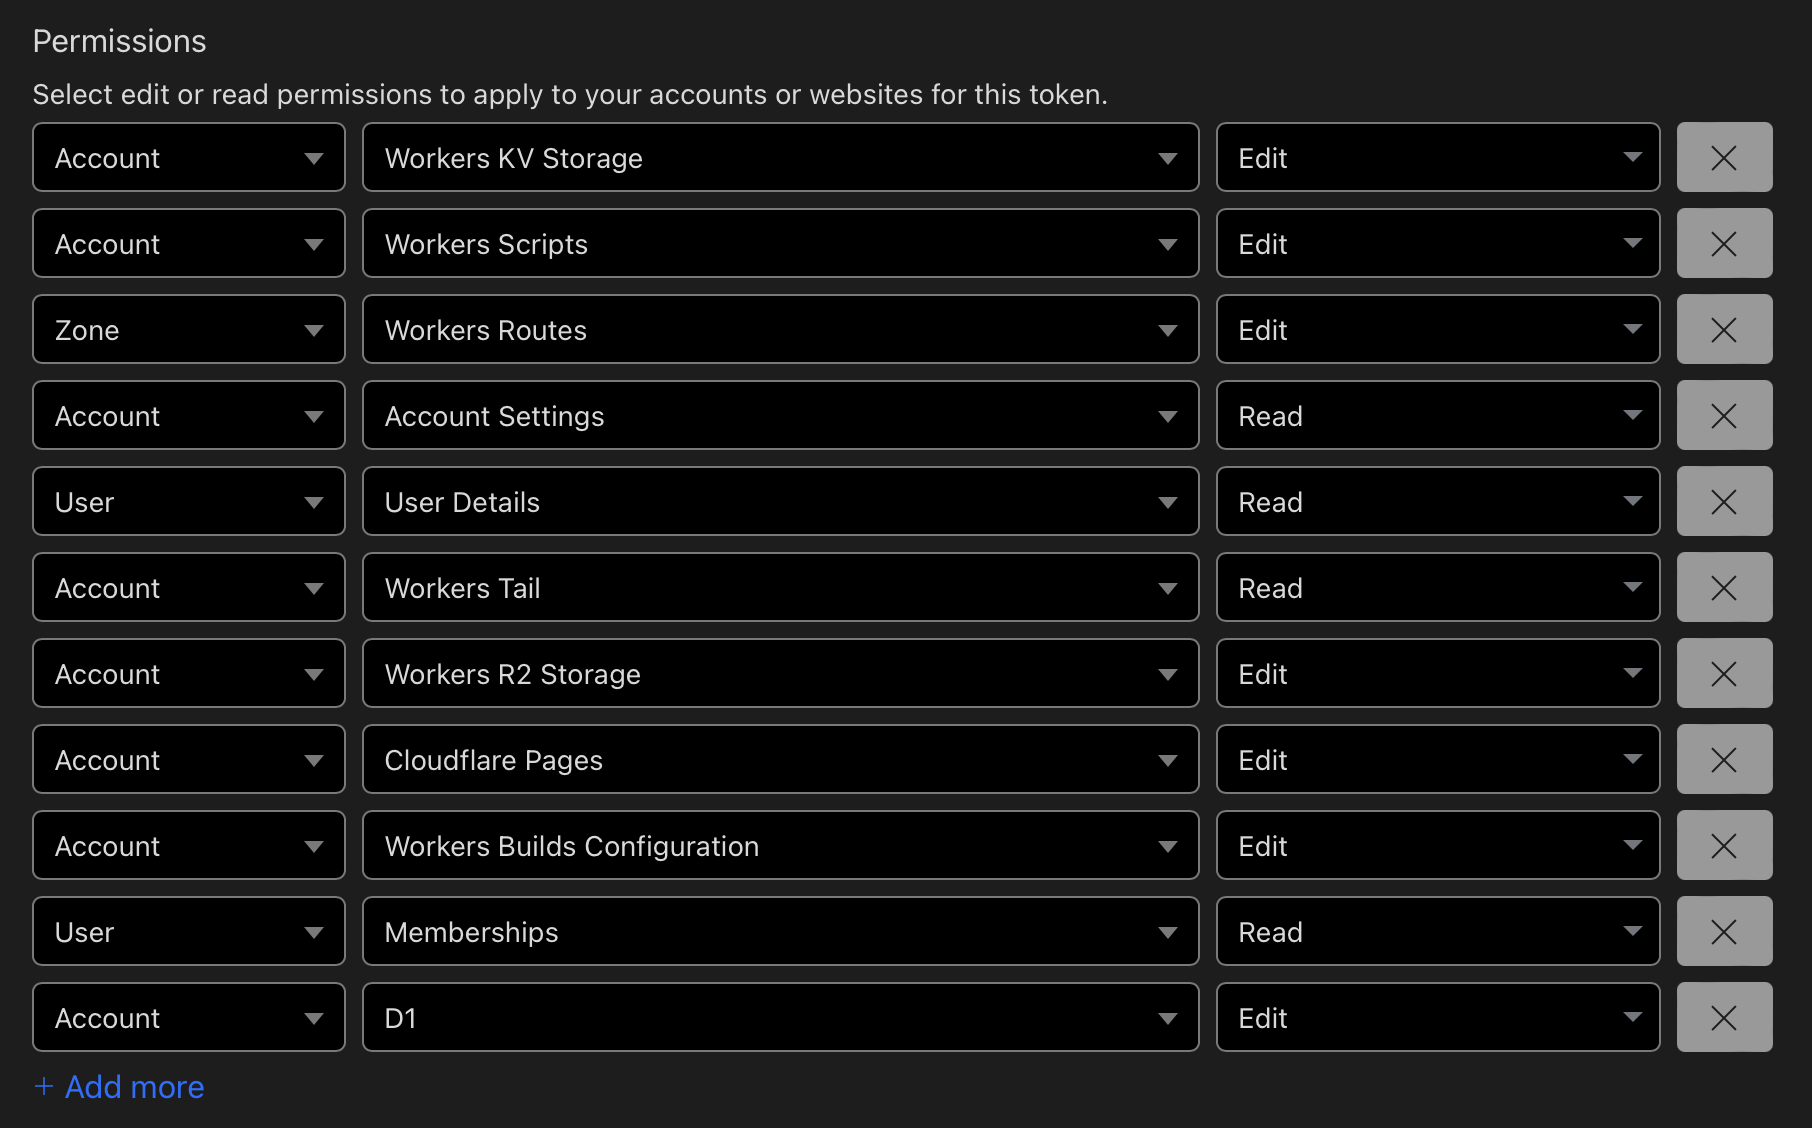
When creating the token, choose the Edit Cloudflare Workers template first, then manually add the D1 Edit permission.
Set Account Resources to "All accounts" and Zone Resources to "All zones".
For reference, the Cloudflare API token permissions should look like this:
3. Configure GitHub Actions secrets in your fork
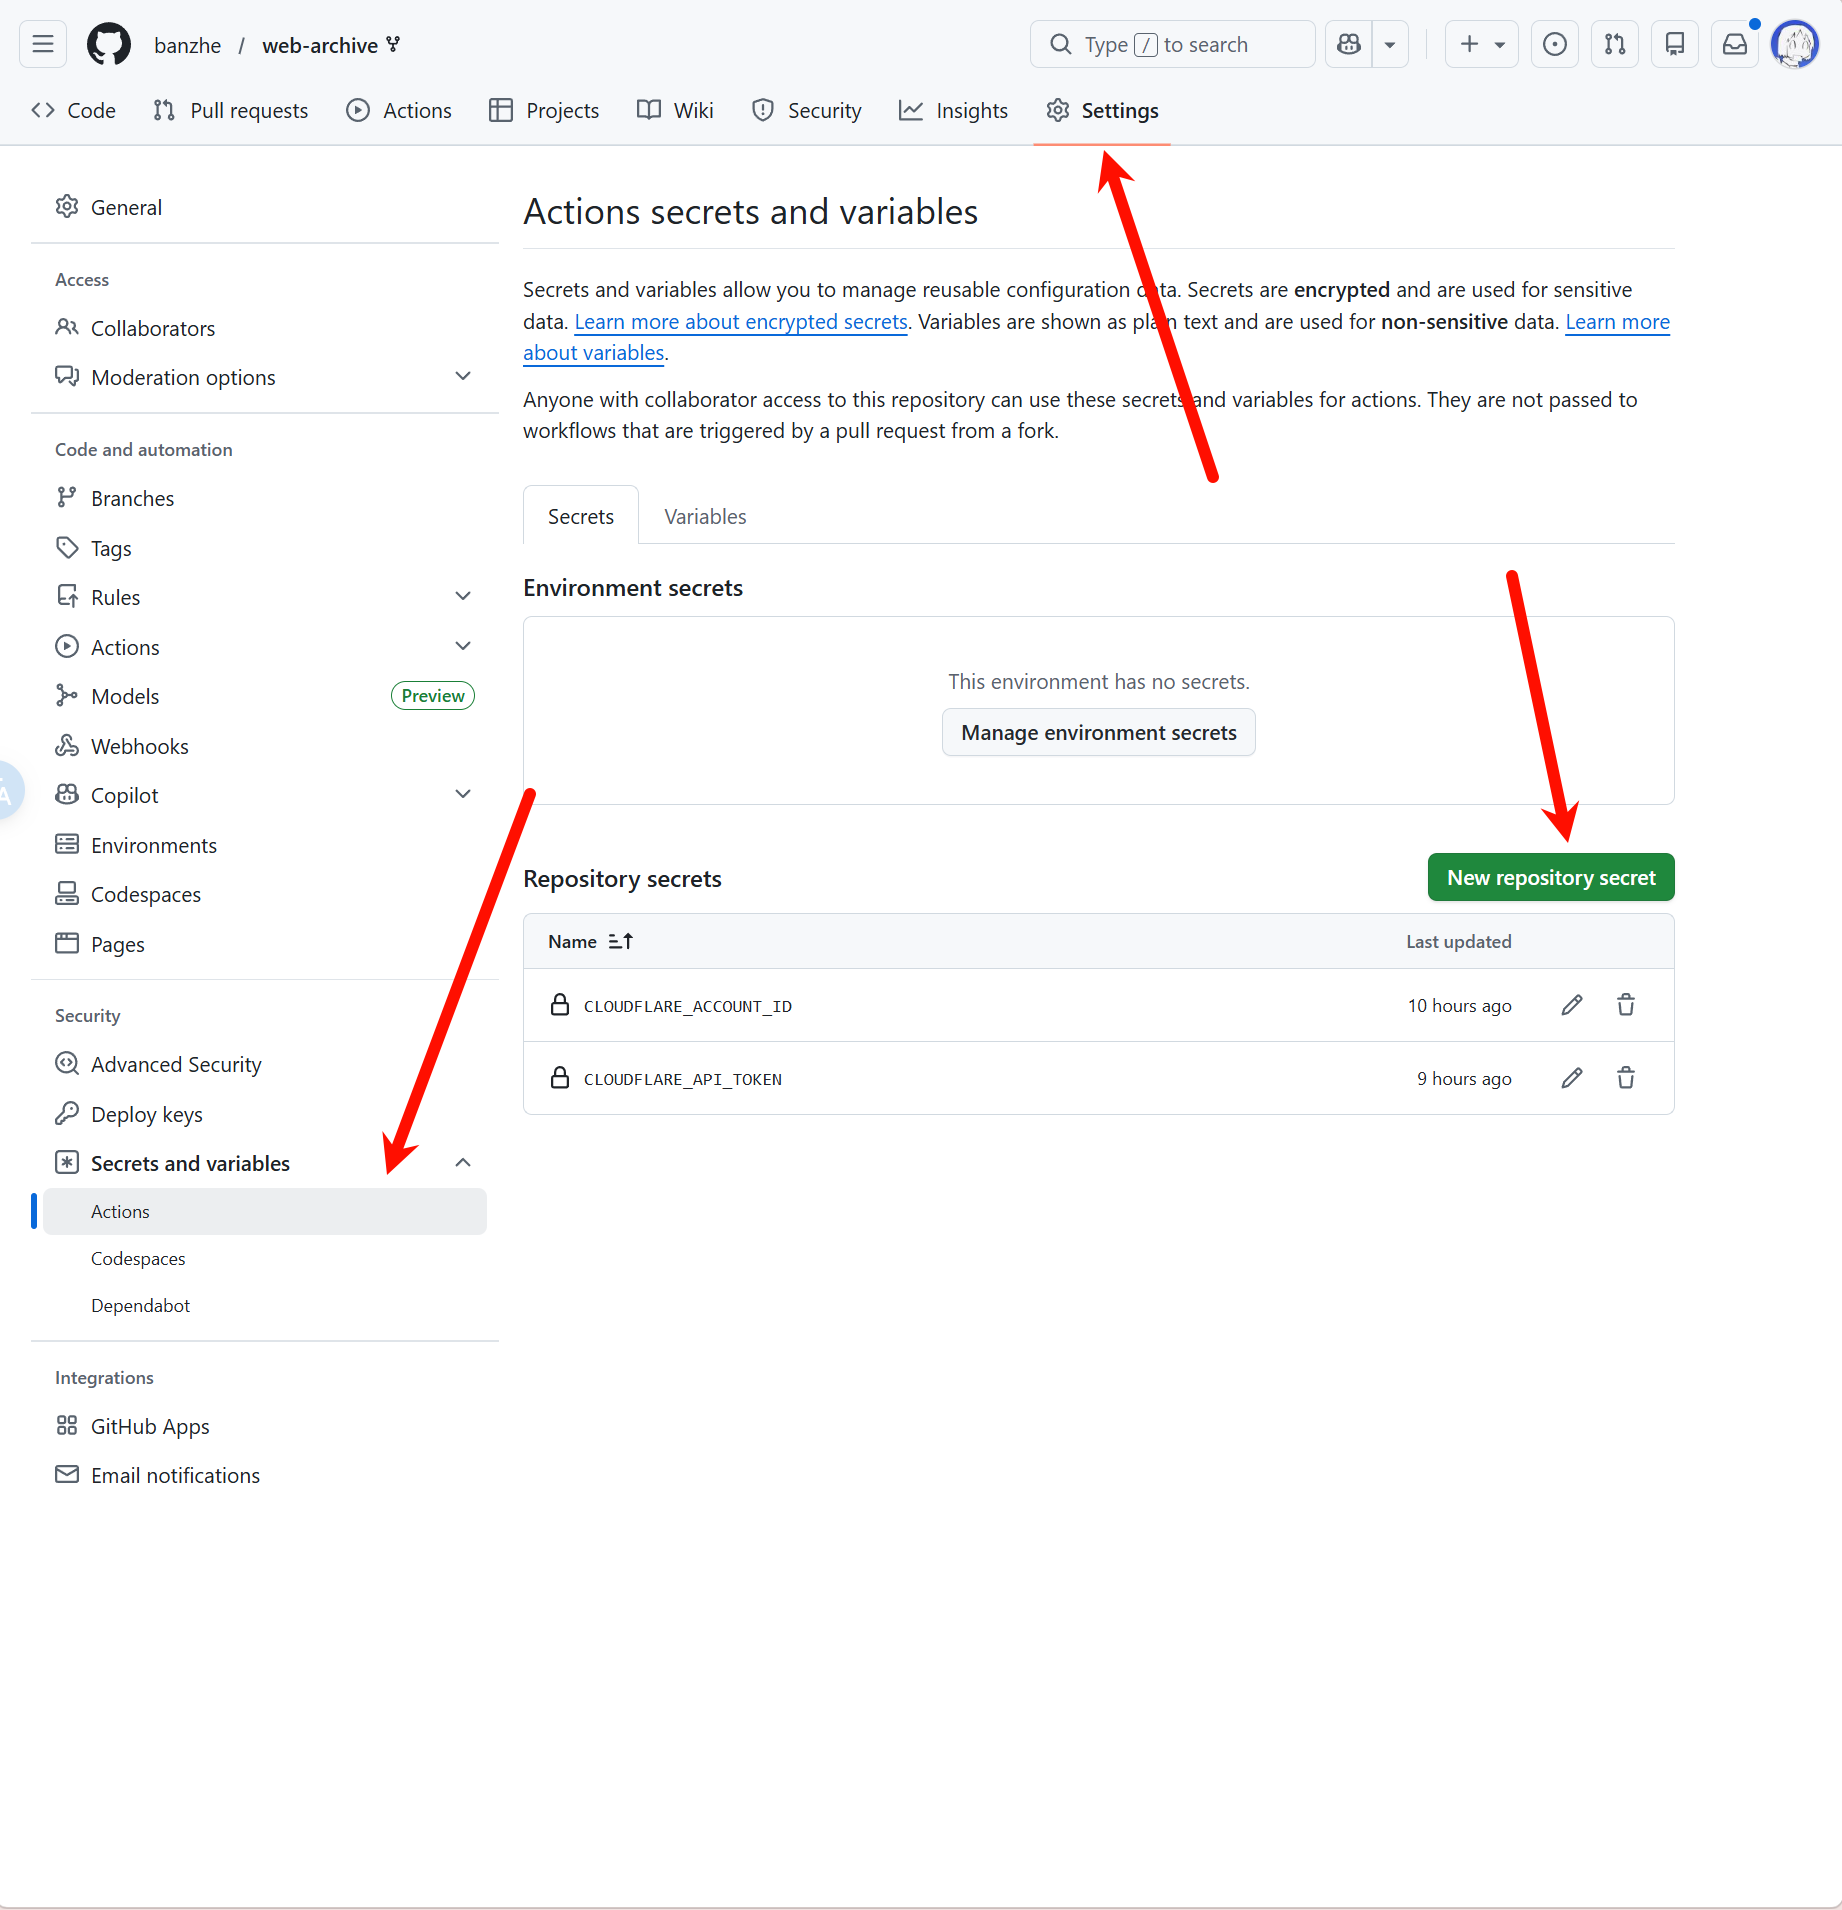
Go to Settings -> Secrets and variables -> Actions in your forked repository, then create these two repository secrets:
CLOUDFLARE_ACCOUNT_IDCLOUDFLARE_API_TOKEN
The Secrets configuration page looks like this:
4. Enable GitHub Actions and run the deployment workflow
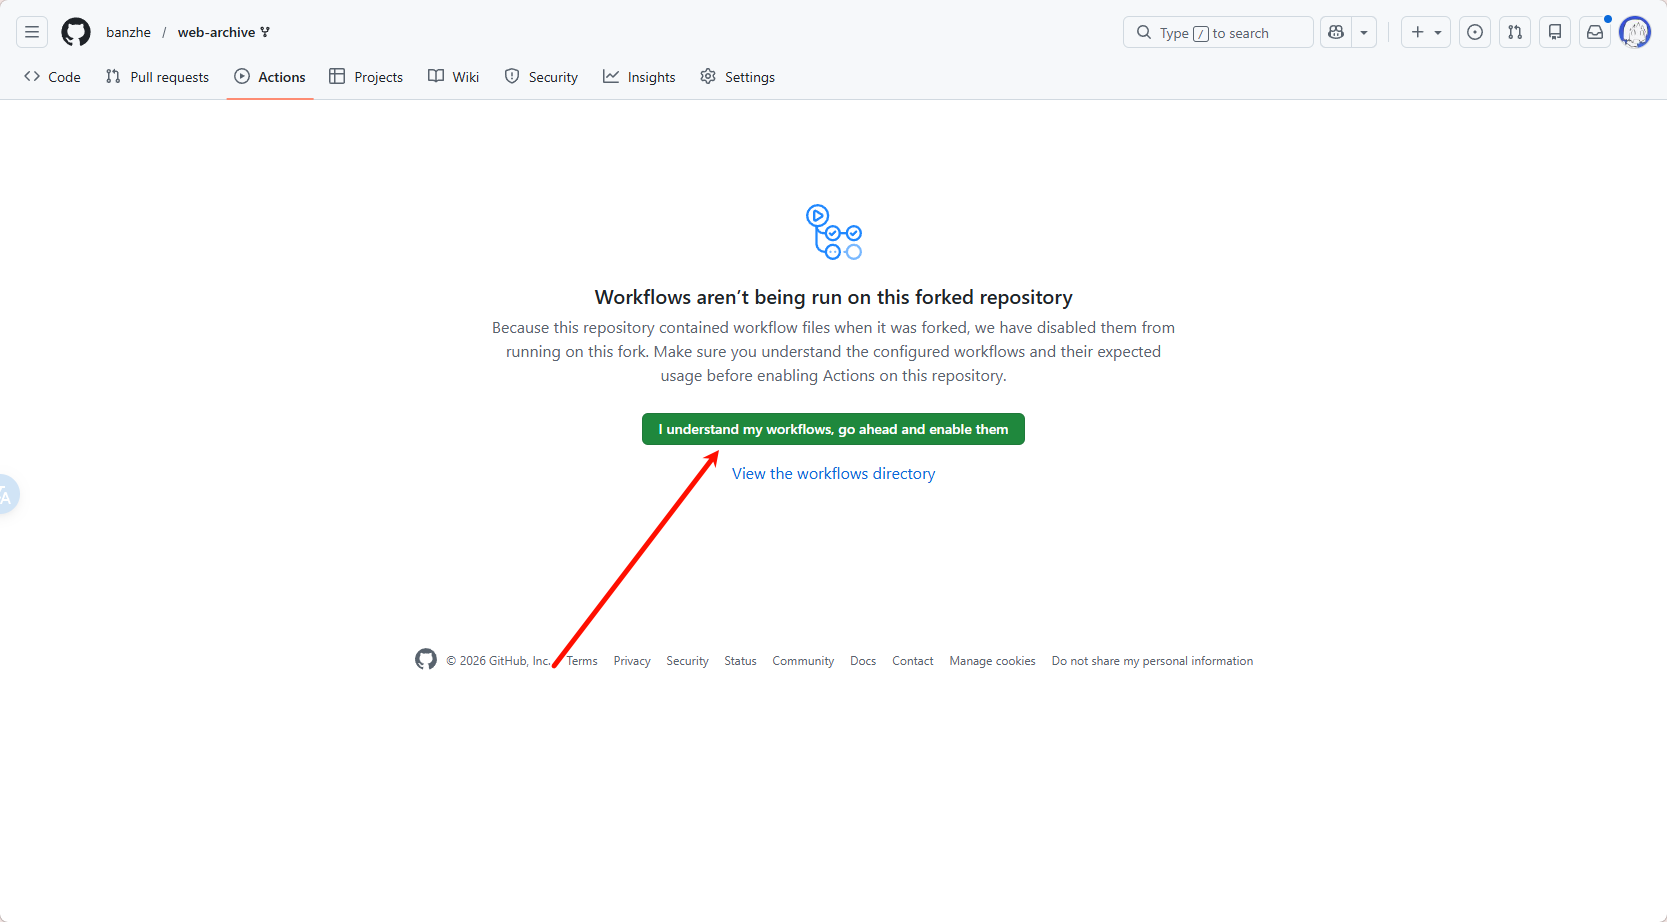
Open the Actions page in your forked repository. If GitHub shows that Actions are disabled for the fork, enable them first.
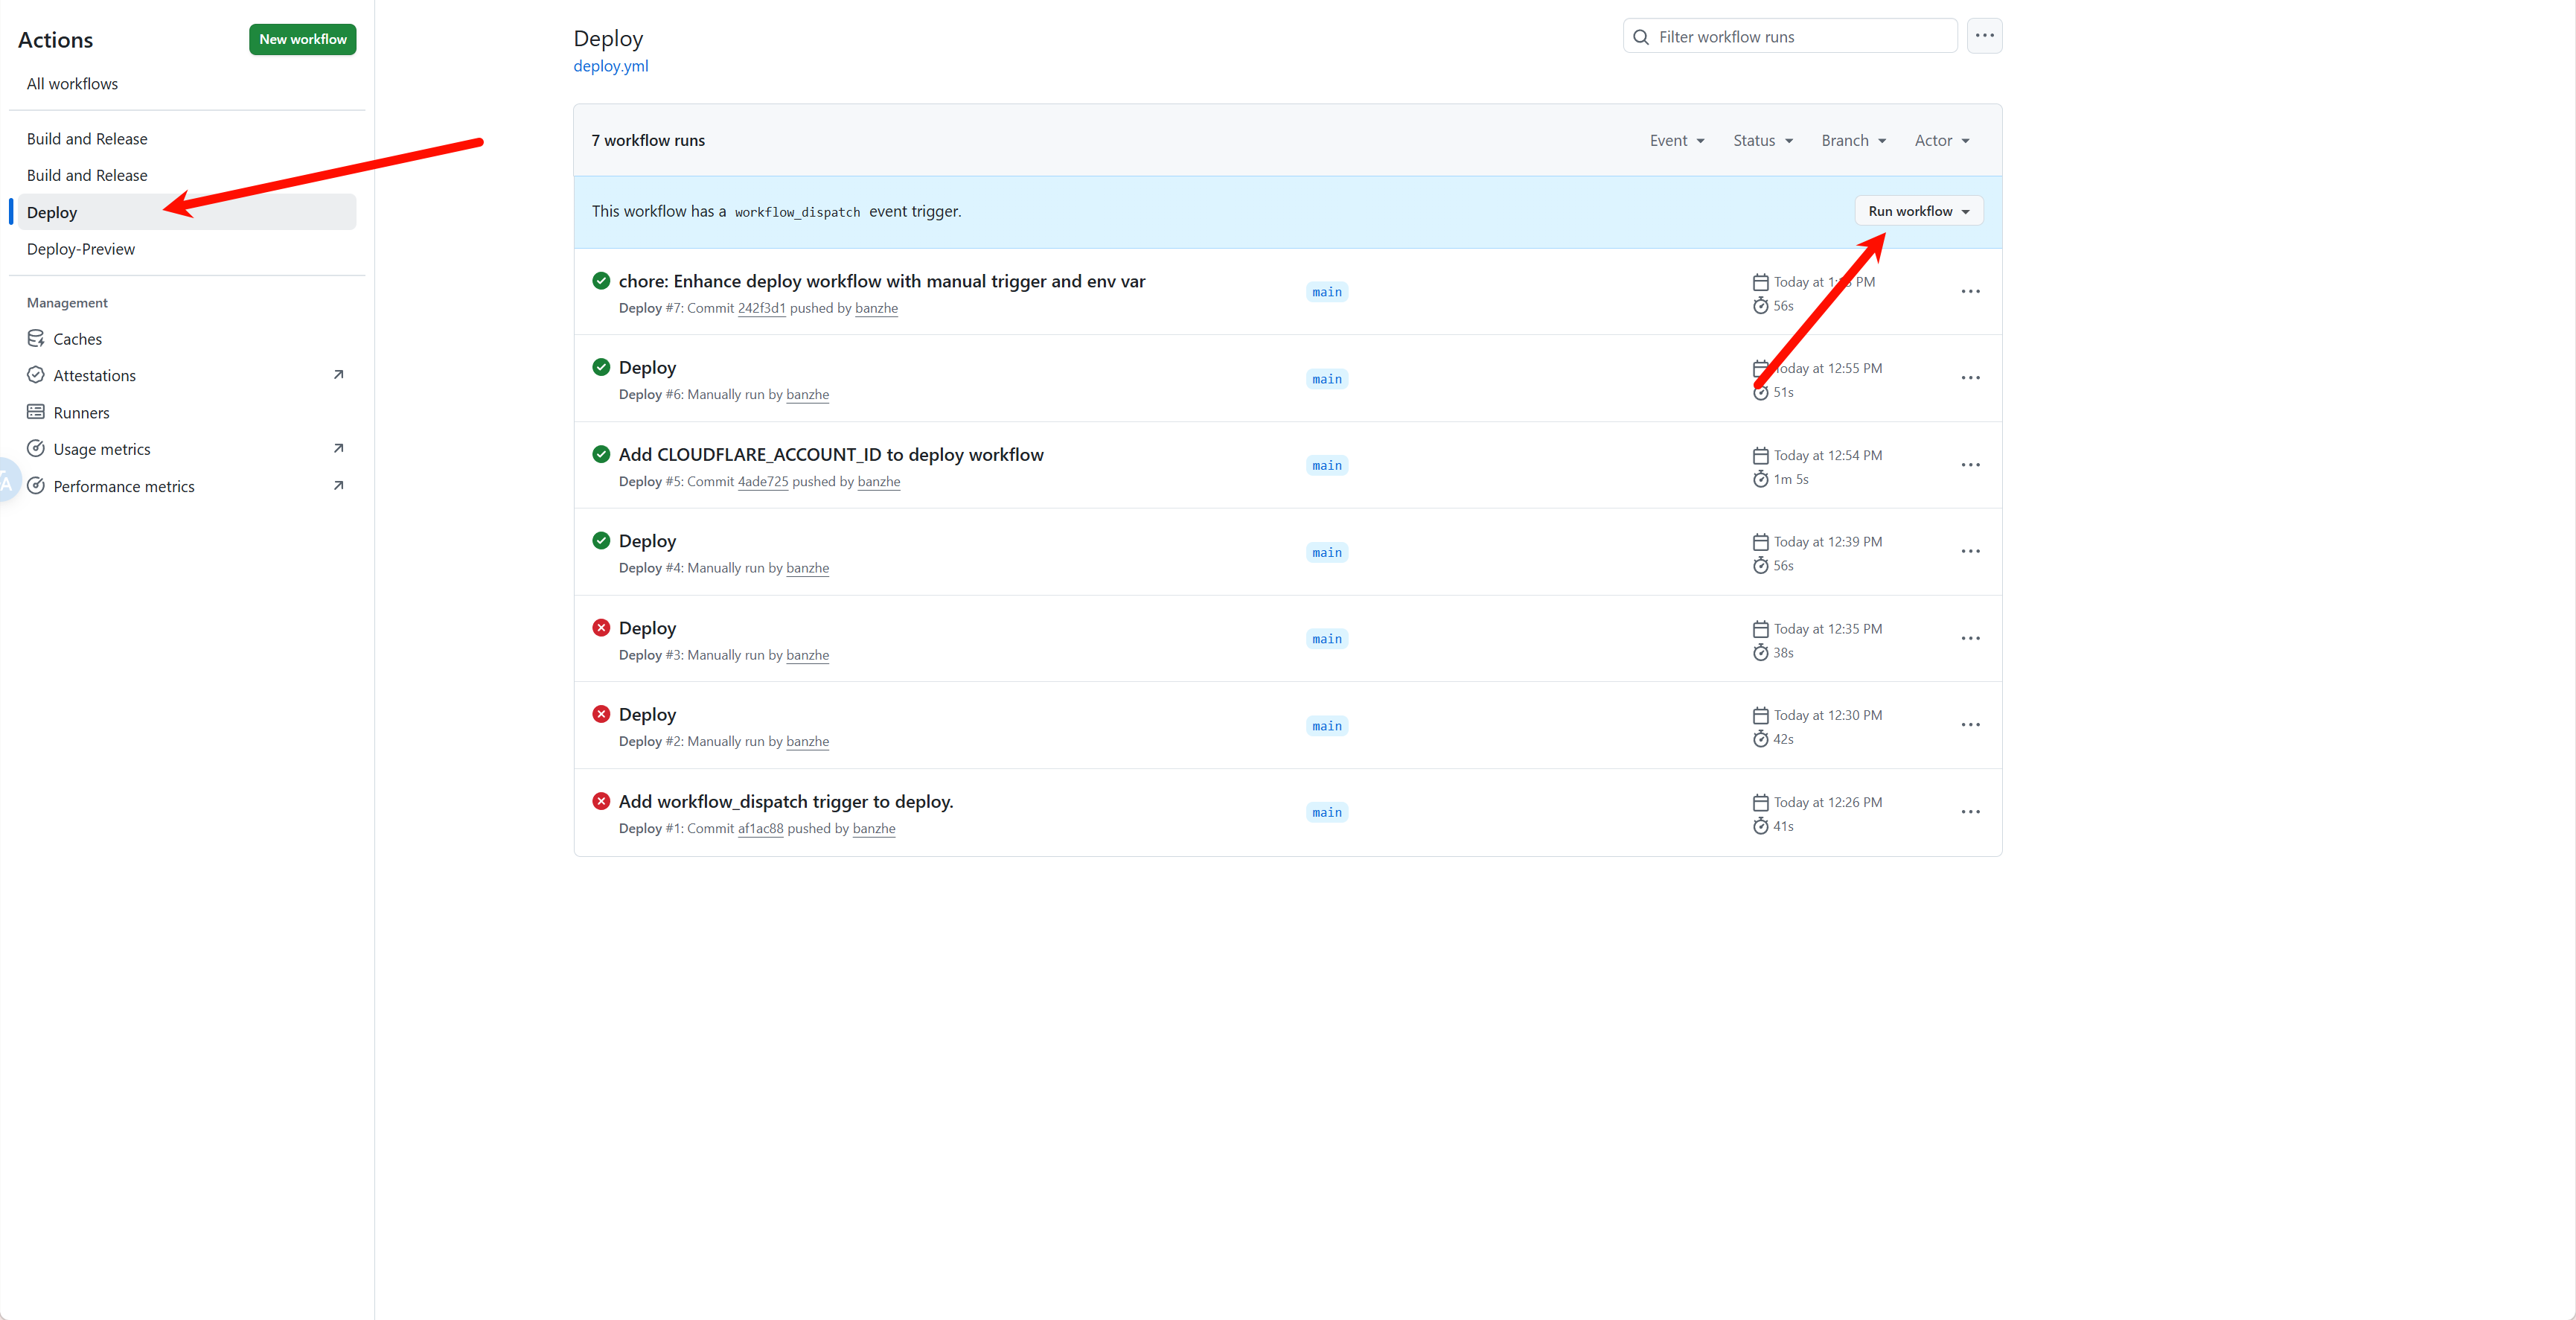
After Actions are enabled, select the Deploy workflow from the workflow list, then click Run workflow to trigger deployment manually.
IMPORTANT
After deployment, log in as soon as possible. The first user to log in will be assigned as the administrator.
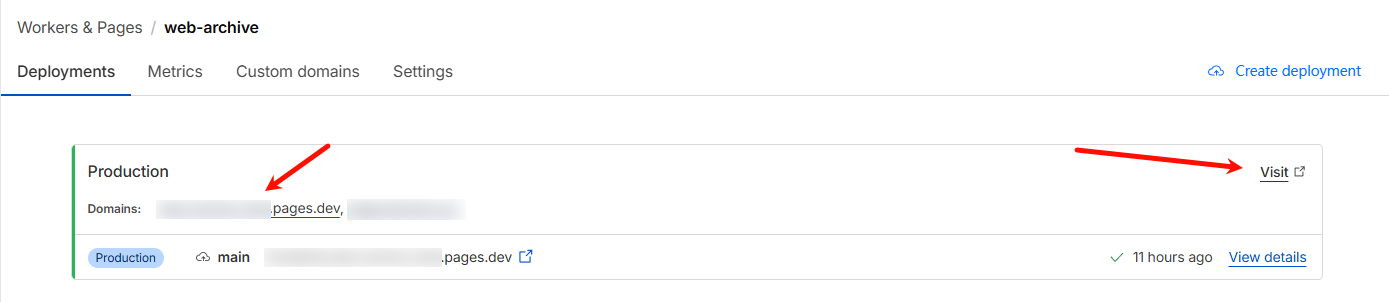
After deployment finishes, you can find the service URL in the Cloudflare Workers dashboard. Use the formal URL without a hash, and do not copy the preview URL with a random hash.
Command Deploy
Requirements: Local installation of node environment.
Command deployment is more troublesome to update, so it is recommended to use Github Actions deployment.
0. Download the code
Download the latest service.zip from the release page, unzip it, and execute the following commands in the root directory.
1. Login
npx wrangler login2. Create R2 storage bucket
npx wrangler r2 bucket create web-archiveSuccess output:
 ⛅️ wrangler 3.78.10 (update available 3.80.4)
--------------------------------------------------------

Creating bucket web-archive with default storage class set to Standard.
Created bucket web-archive with default storage class set to Standard.
3. Create D1 database
npx wrangler d1 create web-archiveSuccess output:
✅ Successfully created DB 'web-archive' in region UNKNOWN
Created your new D1 database.

[[d1_databases]]
binding = "DB" # i.e. available in your Worker on env.DB
database_name = "web-archive"
database_id = "xxxx-xxxx-xxxx-xxxx-xxxx"
Copy the last line of the output, replace the database_id value in the wrangler.toml file.
Then execute the following command to initialize the database:
npx wrangler d1 migrations apply web-archive --remoteSuccess output:
🌀 Executing on remote database web-archive (7fd5a5ce-79e7-4519-a5fb-2f9a3af71064):
🌀 To execute on your local development database, remove the --remote flag from your wrangler command.
Note: if the execution fails to complete, your DB will return to its original state and you can safely retry.
├ 🌀 Uploading 7fd5a5ce-79e7-4519-a5fb-2f9a3af71064.0a40ff4fc67b5bdf.sql
│ 🌀 Uploading complete.
│
🌀 Starting import...
🌀 Processed 9 queries.
🚣 Executed 9 queries in 0.00 seconds (13 rows read, 13 rows written)
   Database is currently at bookmark 00000001-00000005-00004e2b-c977a6f2726e175274a1c75055c23607.
┌────────────────────────┬───────────┬──────────────┬────────────────────┐
│ Total queries executed │ Rows read │ Rows written │ Database size (MB) │
├────────────────────────┼───────────┼──────────────┼────────────────────┤
│ 9                      │ 13        │ 13           │ 0.04               │
└────────────────────────┴───────────┴──────────────┴────────────────────┘
4. Deploy service
npx wrangler pages deploySuccess output:
成功输出:
The project you specified does not exist: "web-archive". Would you like to create it?
❯ Create a new project
✔ Enter the production branch name: … dev
✨ Successfully created the 'web-archive' project.
▲ [WARNING] Warning: Your working directory is a git repo and has uncommitted changes

  To silence this warning, pass in --commit-dirty=true

🌎  Uploading... (3/3)

✨ Success! Uploaded 3 files (3.29 sec)

✨ Compiled Worker successfully
✨ Uploading Worker bundle
✨ Uploading _routes.json
🌎 Deploying...
✨ Deployment complete! Take a peek over at https://web-archive-xxxx.pages.dev
Docker Local Deployment
Deploy Web Archive locally using Docker without relying on Cloudflare. Powered by node-cf-worker runtime, using local SQLite for data storage.
Prerequisites
- Docker installed
Quick Start
# Pull the image
docker pull ghcr.io/ray-d-song/web-archive:latest

# Run with persistent data
docker run -d \
  -p 8787:8787 \
  -v web-archive-data:/app/service/.wrangler/state \
  ghcr.io/ray-d-song/web-archive:latest
Or build from source:
git clone https://github.com/ray-d-song/web-archive.git
cd web-archive
docker build -t web-archive .
docker run -d \
  -p 8787:8787 \
  -v web-archive-data:/app/service/.wrangler/state \
  web-archive
Docker Compose (Recommended)
Create a docker-compose.yml:
services:
  web-archive:
    image: ghcr.io/ray-d-song/web-archive:latest
    container_name: web-archive
    ports:
      - "8787:8787"
    volumes:
      - web-archive-data:/app/service/.wrangler/state
    restart: unless-stopped

volumes:
web-archive-data:docker compose up -dConfiguration
The service listens on port 8787 by default. Access the web interface at http://localhost:8787.
IMPORTANT
After deployment, log in as soon as possible. The first user to log in will be assigned as the administrator.
All data is stored in the mounted volume web-archive-data, including archived pages, user data, and configuration. Data persists across container restarts.
To use a different port, modify the port mapping in docker run or docker-compose.yml, e.g. -p 3000:8787 maps the service to your local port 3000.
AI Configuration
Web Archive supports AI-powered auto-tagging. Configure an OpenAI-compatible API via environment variables:
docker run -d \
  -p 8787:8787 \
  -v web-archive-data:/app/service/.wrangler/state \
  -e OPENAI_API_KEY="sk-xxx" \
  -e OPENAI_BASE_URL="https://api.openai.com/v1" \
  ghcr.io/ray-d-song/web-archive:latest
Docker Compose example:
services:
  web-archive:
    image: ghcr.io/ray-d-song/web-archive:latest
    ports:
      - "8787:8787"
    volumes:
      - web-archive-data:/app/service/.wrangler/state
    environment:
      - OPENAI_API_KEY=sk-xxx
      - OPENAI_BASE_URL=https://api.openai.com/v1
    restart: unless-stopped

volumes:
  web-archive-data:
NOTE
OPENAI_BASE_URLdefaults tohttps://api.openai.com/v1. Specify a custom URL if using another compatible service (e.g. Ollamahttp://localhost:11434/v1).- For custom model mapping (translating Cloudflare model IDs to your provider's model names), mount a custom
wrangler.toml. See node-cf-worker docs.
How to update
For Docker deployment, update by pulling the latest image and restarting the container:
docker compose pull && docker compose up -dFor Github Actions deployment, the latest code will be automatically synced to the fork repository.