GitHub Actions 部署
1. 在 GitHub 上 Fork 本项目
先将本项目 Fork 到自己的 GitHub 账号下,后续的部署配置和工作流运行都在 Fork 后的仓库中完成。
2. 准备 Cloudflare 凭据
你需要在 Cloudflare 中准备以下两个 GitHub Actions Secrets:
CLOUDFLARE_ACCOUNT_ID:Cloudflare 账号 ID,可参考 Find account and zone IDs · Cloudflare Fundamentals docs 获取。CLOUDFLARE_API_TOKEN:用于 GitHub Actions 调用 Cloudflare API 的令牌,可在 API 令牌 | Cloudflare 页面创建。
IMPORTANT
R2 功能需要先在 Cloudflare 面板中手动开通。请在开通后再进行部署;如果首次运行失败,开通后重新运行 GitHub Actions workflow 即可。 这里只需要开通 R2 功能,不需要手动创建存储桶,部署时会自动创建 web-archive 存储桶。
NOTE
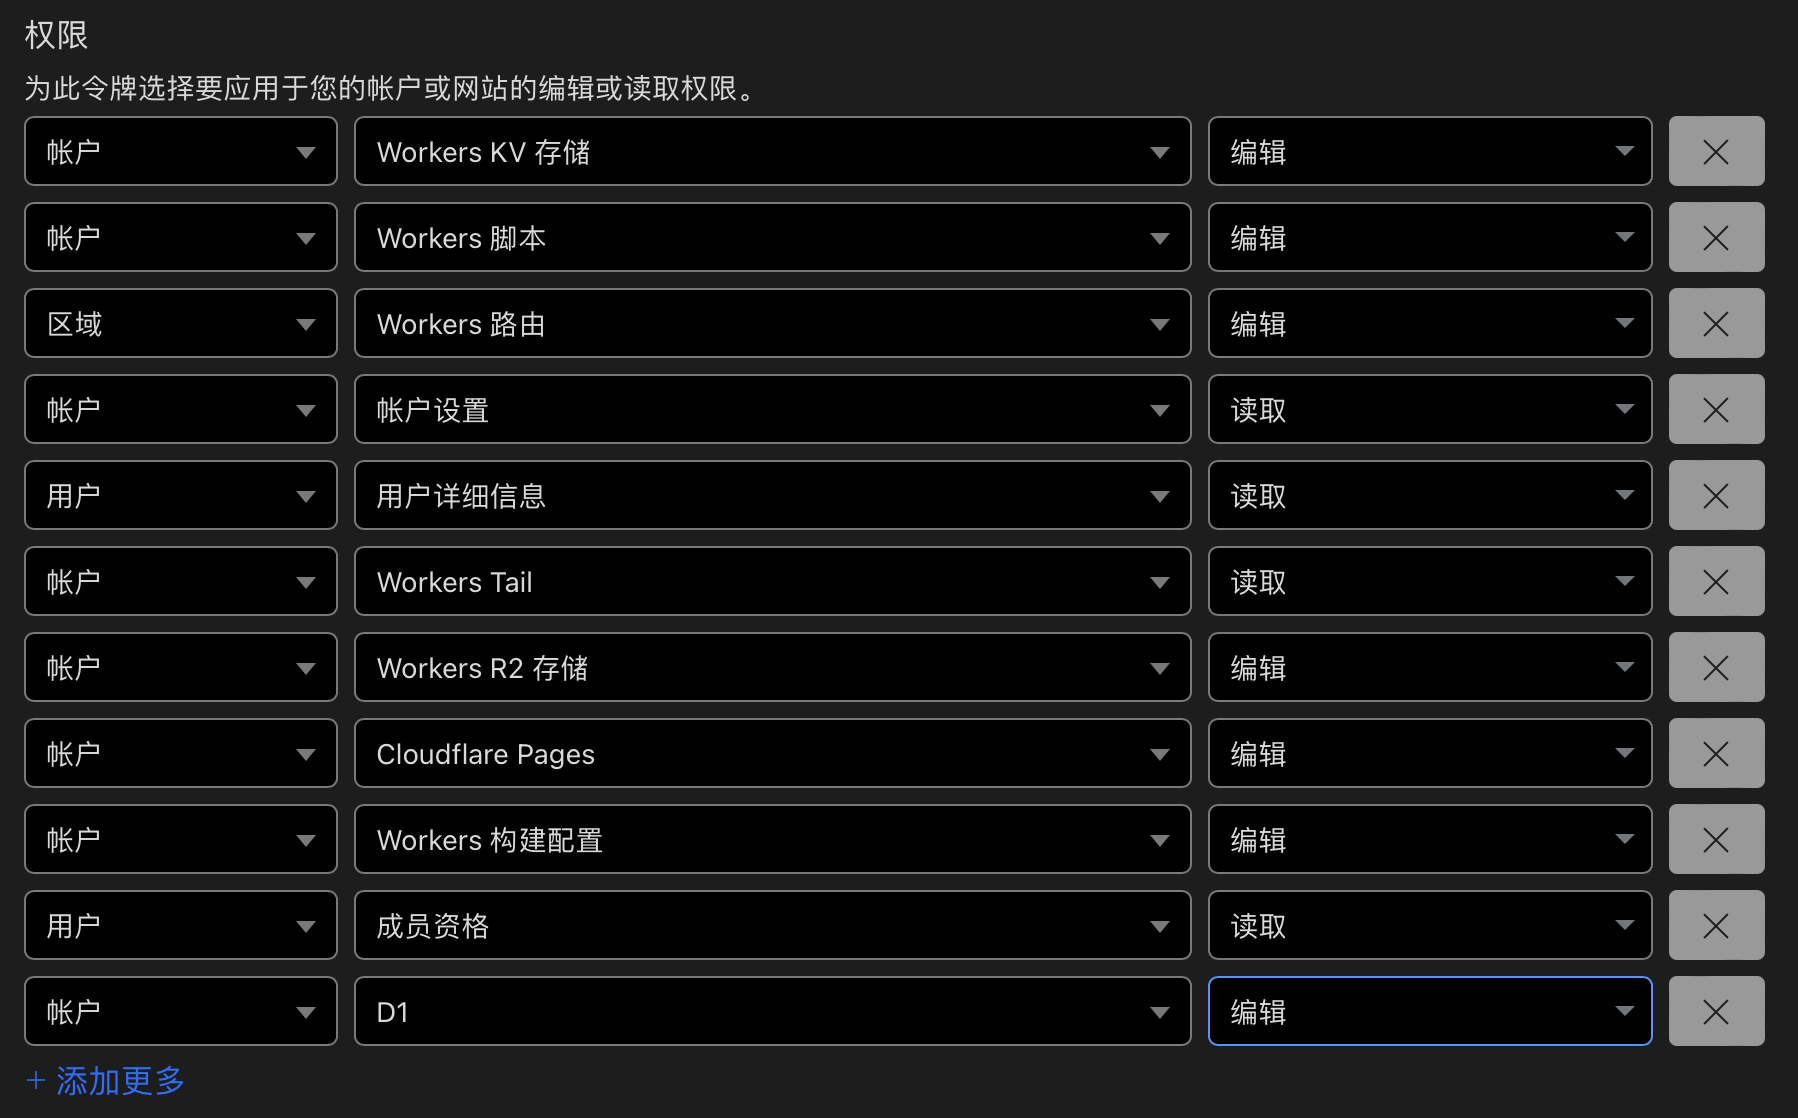
创建令牌时,直接选择 编辑 Cloudflare Workers 模板,再手动添加 D1 编辑 权限。 账户资源选择“所有账户”,区域资源选择“所有区域”即可。
Cloudflare API 令牌权限配置可参考下图:
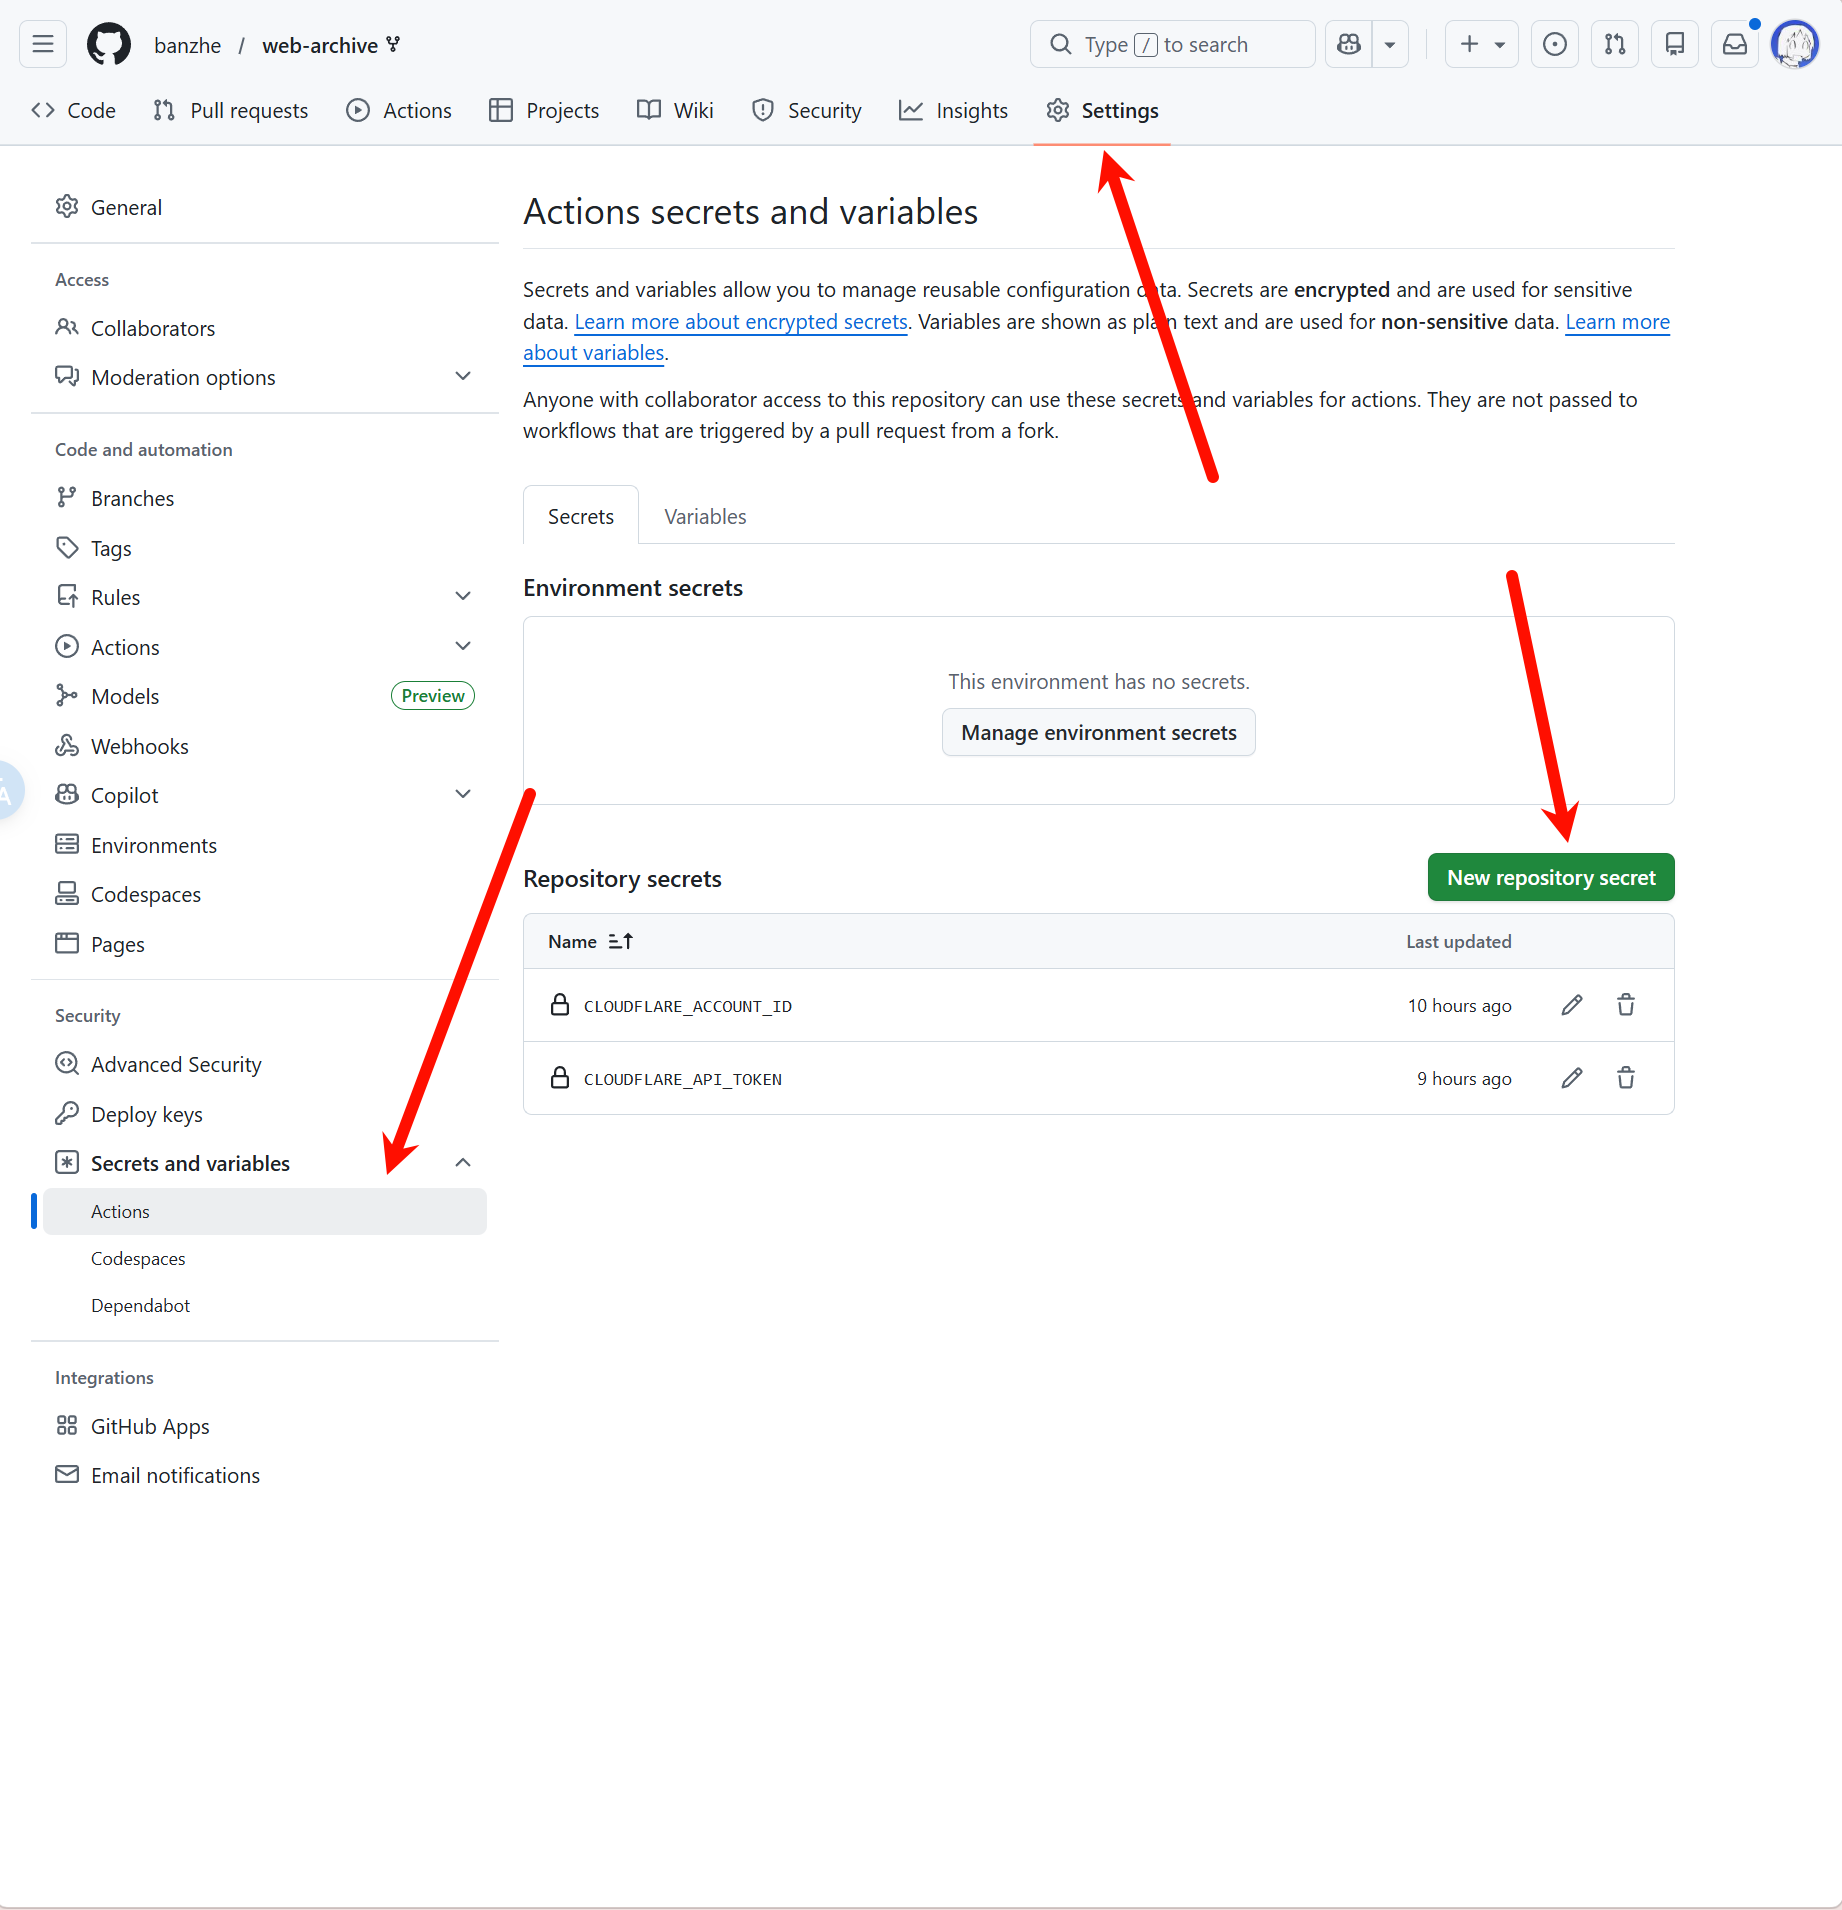
3. 在 Fork 仓库中配置 GitHub Actions Secrets
进入 Fork 仓库的 Settings -> Secrets and variables -> Actions 页面,分别创建以下两个仓库 Secret:
CLOUDFLARE_ACCOUNT_IDCLOUDFLARE_API_TOKEN
Secrets 配置页面如下:
4. 启用 GitHub Actions 并运行部署 workflow
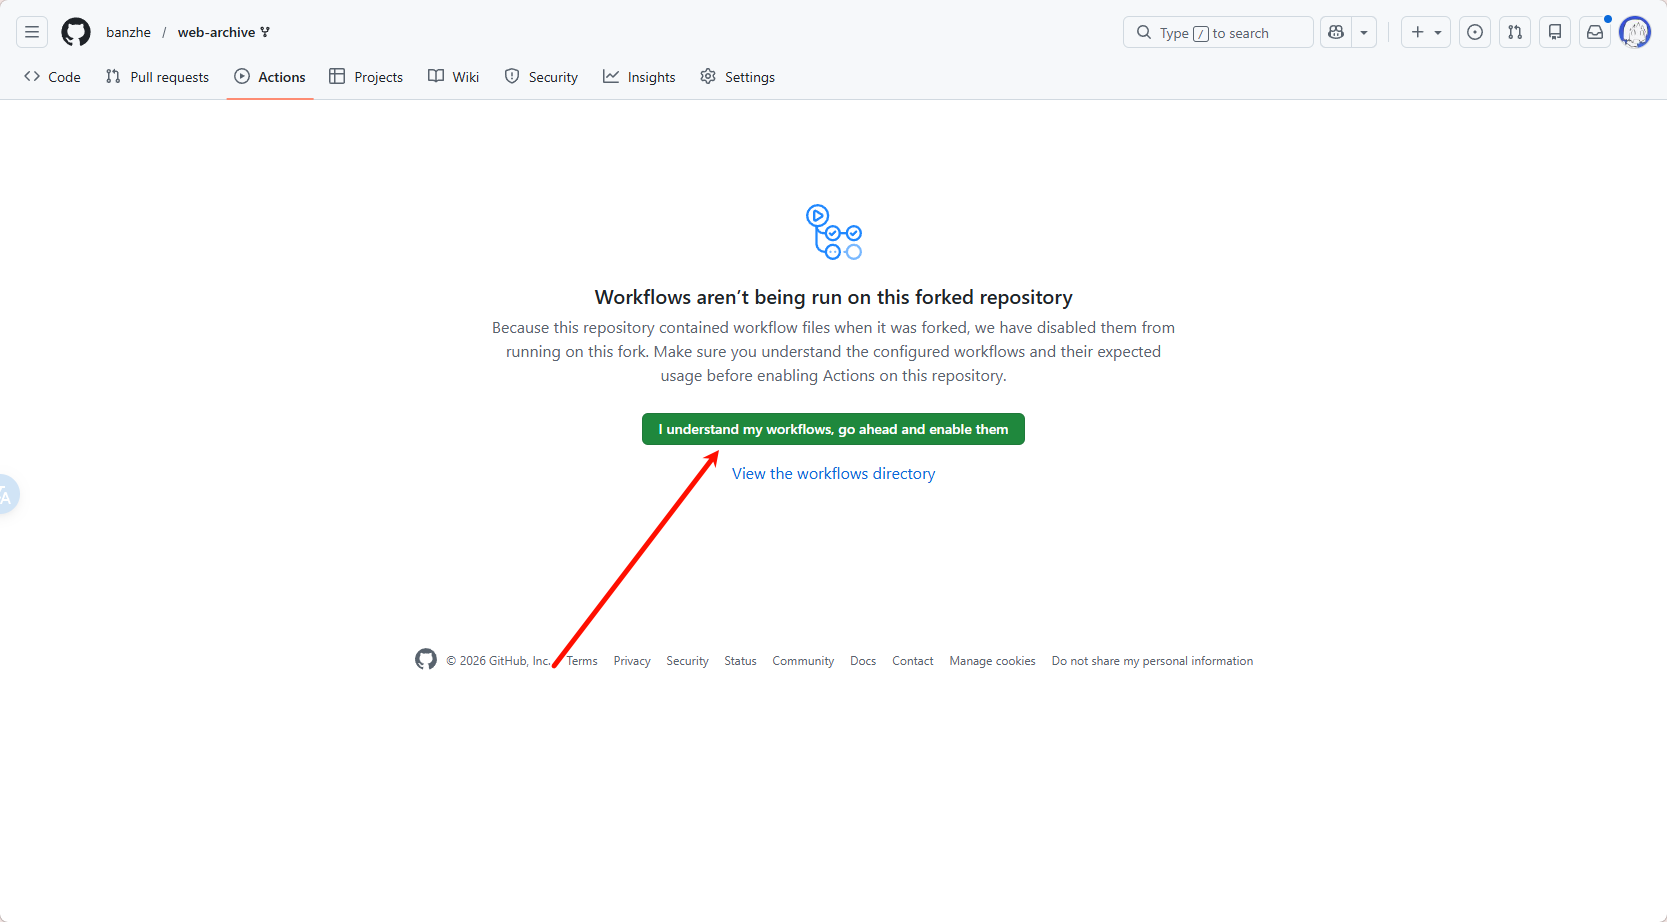
进入 Fork 仓库的 Actions 页面;如果 GitHub 提示该 Fork 仓库的 Actions 尚未启用,先点击启用。
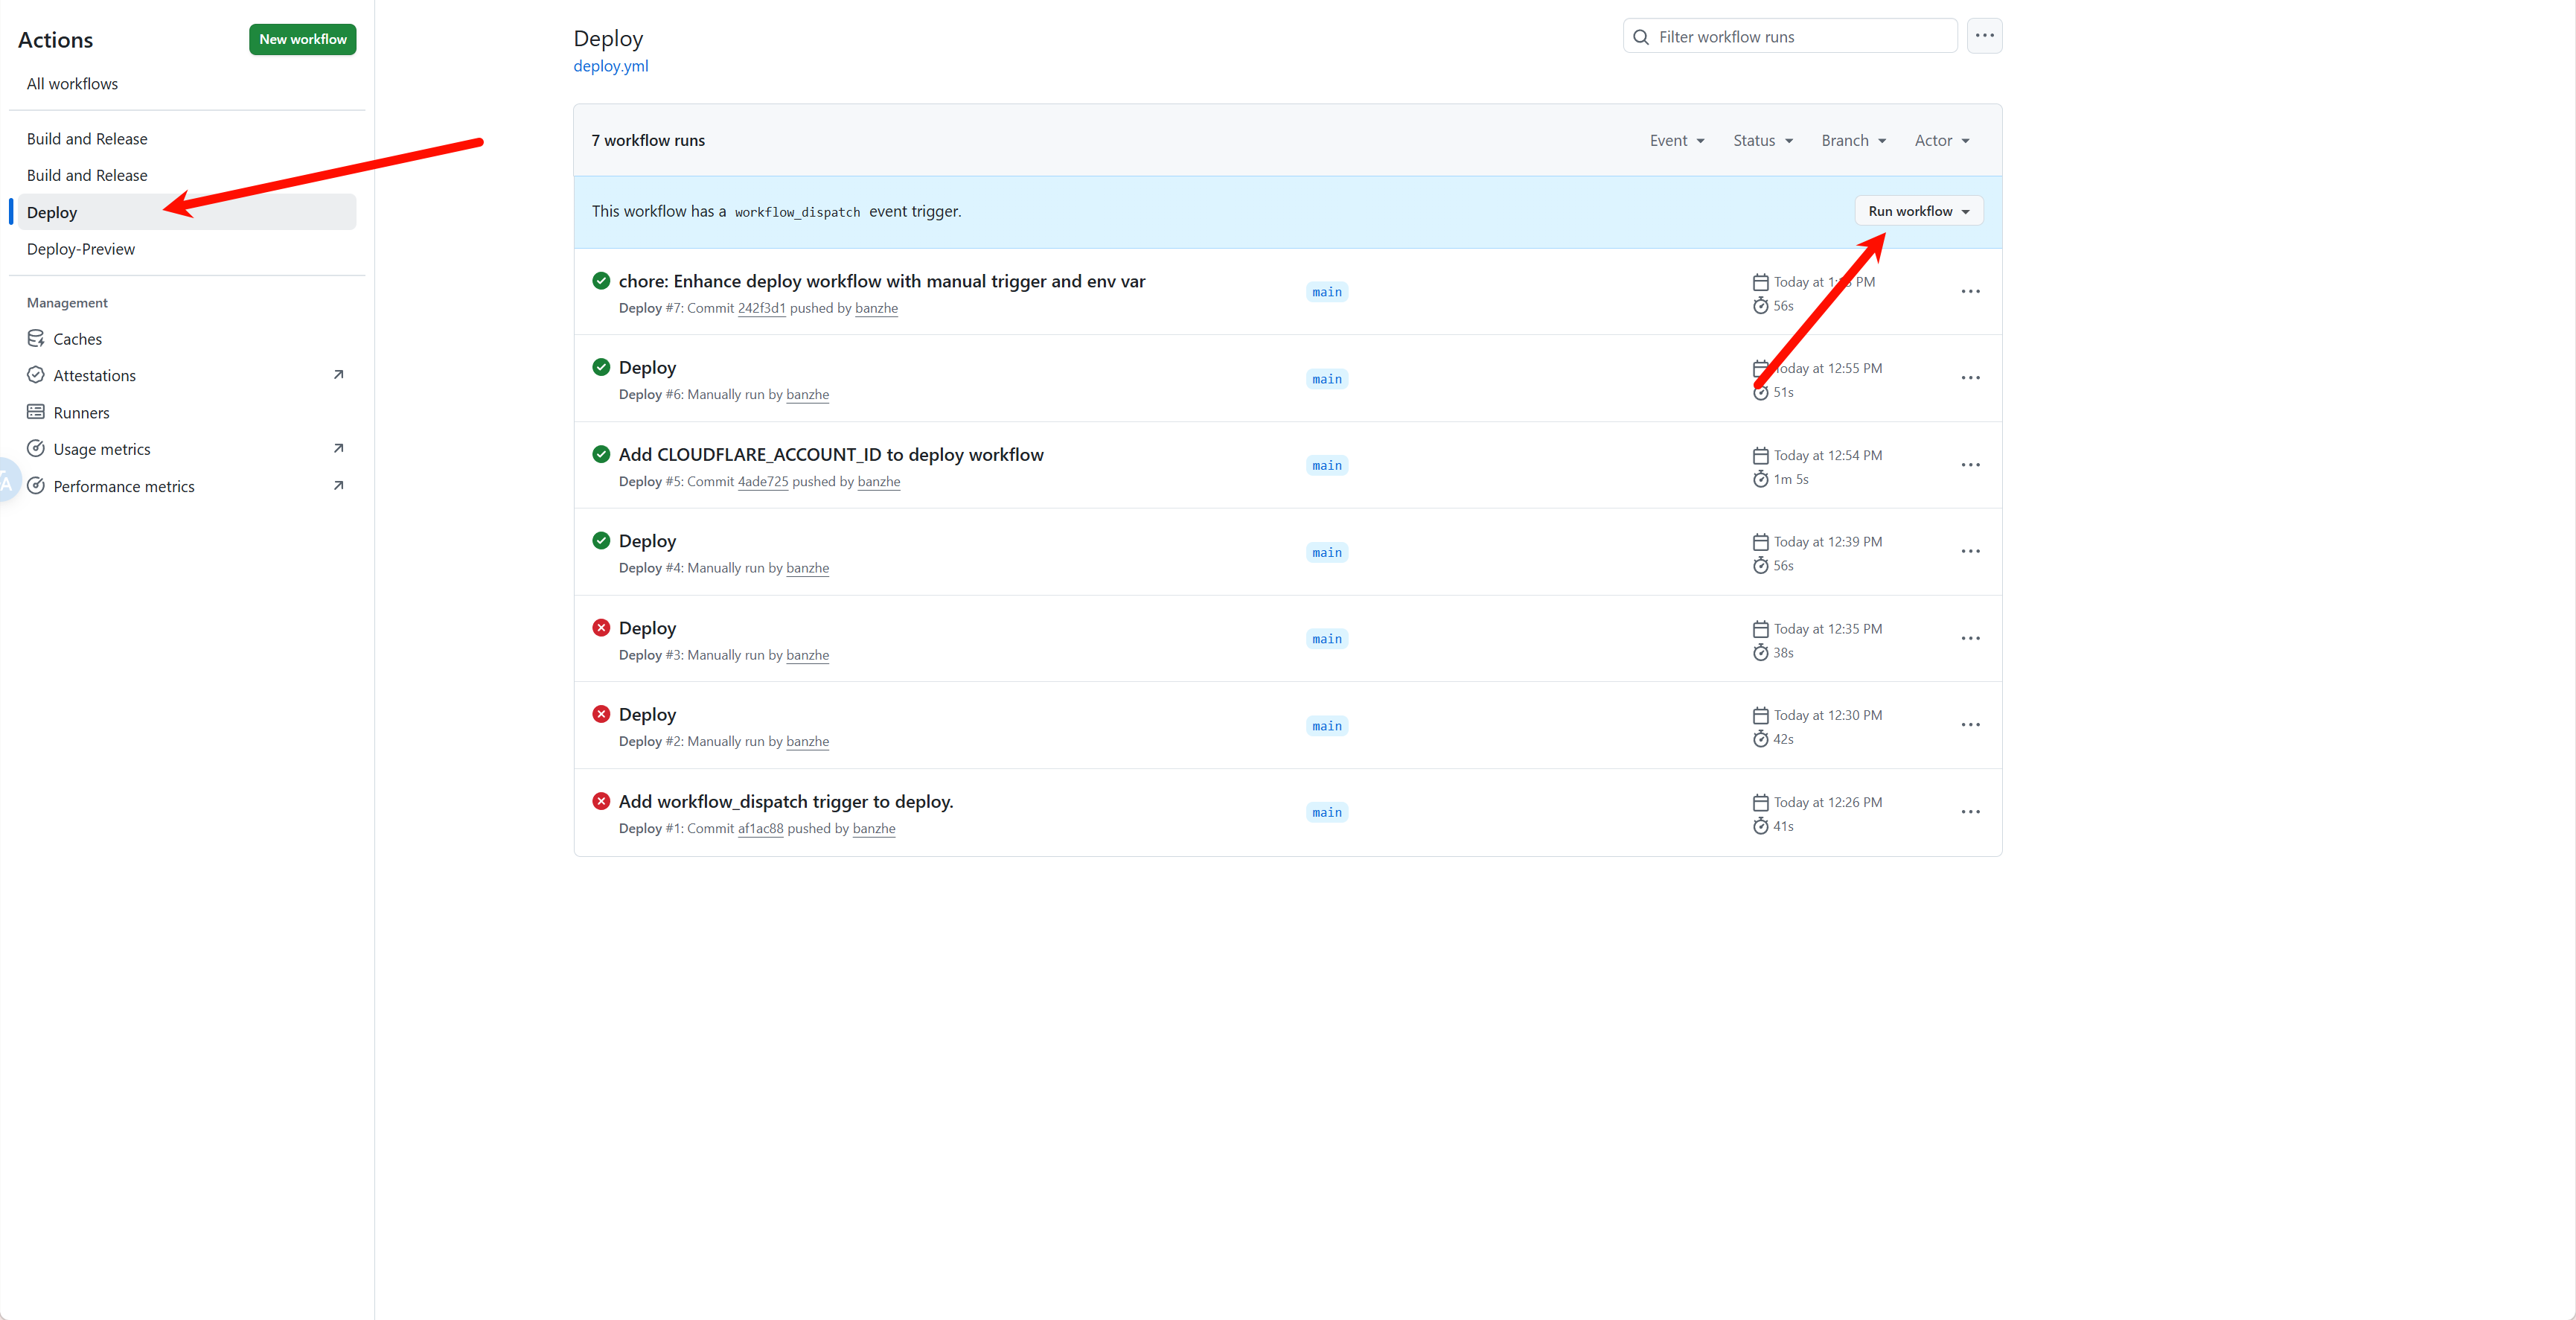
启用后,在工作流列表中选择 Deploy,再点击 Run workflow 手动触发部署。
IMPORTANT
部署后请尽快登录,首个登录的用户会被设置为管理员。
部署完成后,可以在 Cloudflare Workers 页面中找到服务的访问链接。访问时请使用不带 hash 的正式链接,不要复制带随机 hash 的预览链接。 
命令部署
要求本地已安装 Node 环境。 命令部署的更新流程相对更繁琐,推荐优先使用 GitHub Actions 部署。
0. 下载代码
在 release 页面下载最新的 service.zip,解压后在根目录执行后续操作。
1. 登录
npx wrangler login2. 创建 r2 存储桶
npx wrangler r2 bucket create web-archive成功输出:
 ⛅️ wrangler 3.78.10 (update available 3.80.4)
--------------------------------------------------------

Creating bucket web-archive with default storage class set to Standard.
Created bucket web-archive with default storage class set to Standard.
3. 创建 d1 数据库
# 创建数据库
npx wrangler d1 create web-archive
执行输出:
 ⛅️ wrangler 3.78.10 (update available 3.80.4)
--------------------------------------------------------

✅ Successfully created DB 'web-archive' in region UNKNOWN
Created your new D1 database.

[[d1_databases]]
binding = "DB" # i.e. available in your Worker on env.DB
database_name = "web-archive"
database_id = "xxxx-xxxx-xxxx-xxxx-xxxx"
拷贝最后一行,替换 wrangler.toml 文件中 database_id 的值。
然后执行初始化 sql:
npx wrangler d1 migrations apply web-archive --remote成功输出:
🌀 Executing on remote database web-archive (7fd5a5ce-79e7-4519-a5fb-2f9a3af71064):
🌀 To execute on your local development database, remove the --remote flag from your wrangler command.
Note: if the execution fails to complete, your DB will return to its original state and you can safely retry.
├ 🌀 Uploading 7fd5a5ce-79e7-4519-a5fb-2f9a3af71064.0a40ff4fc67b5bdf.sql
│ 🌀 Uploading complete.
│
🌀 Starting import...
🌀 Processed 9 queries.
🚣 Executed 9 queries in 0.00 seconds (13 rows read, 13 rows written)
   Database is currently at bookmark 00000001-00000005-00004e2b-c977a6f2726e175274a1c75055c23607.
┌────────────────────────┬───────────┬──────────────┬────────────────────┐
│ Total queries executed │ Rows read │ Rows written │ Database size (MB) │
├────────────────────────┼───────────┼──────────────┼────────────────────┤
│ 9                      │ 13        │ 13           │ 0.04               │
└────────────────────────┴───────────┴──────────────┴────────────────────┘
4. 部署服务
# 部署服务
npx wrangler pages deploy
成功输出:
The project you specified does not exist: "web-archive". Would you like to create it?
❯ Create a new project
✔ Enter the production branch name: … dev
✨ Successfully created the 'web-archive' project.
▲ [WARNING] Warning: Your working directory is a git repo and has uncommitted changes

  To silence this warning, pass in --commit-dirty=true

🌎  Uploading... (3/3)

✨ Success! Uploaded 3 files (3.29 sec)

✨ Compiled Worker successfully
✨ Uploading Worker bundle
✨ Uploading _routes.json
🌎 Deploying...
✨ Deployment complete! Take a peek over at https://web-archive-xxxx.pages.dev
Docker 本地部署
无需依赖 Cloudflare,使用 Docker 在本地部署 Web Archive。基于 node-cf-worker 运行时,使用本地 SQLite 存储数据。
前置条件
- 已安装 Docker
快速开始
# 拉取镜像
docker pull ghcr.io/ray-d-song/web-archive:latest

# 运行并持久化数据
docker run -d \
  -p 8787:8787 \
  -v web-archive-data:/app/service/.wrangler/state \
  ghcr.io/ray-d-song/web-archive:latest
也可以从源码构建:
git clone https://github.com/ray-d-song/web-archive.git
cd web-archive
docker build -t web-archive .
docker run -d \
  -p 8787:8787 \
  -v web-archive-data:/app/service/.wrangler/state \
  web-archive
Docker Compose(推荐)
创建 docker-compose.yml:
services:
  web-archive:
    image: ghcr.io/ray-d-song/web-archive:latest
    container_name: web-archive
    ports:
      - "8787:8787"
    volumes:
      - web-archive-data:/app/service/.wrangler/state
    restart: unless-stopped

volumes:
web-archive-data:docker compose up -d配置说明
服务默认监听 8787 端口,访问 http://localhost:8787 即可打开 Web 界面。
IMPORTANT
部署后请尽快登录,首个登录的用户会被设置为管理员。
所有数据存储在挂载的卷 web-archive-data 中,包括归档页面、用户数据和配置信息,容器重启不会丢失。
如需自定义端口,修改 docker run 或 docker-compose.yml 中的端口映射即可,例如 -p 3000:8787 将服务映射到本机 3000 端口。
AI 配置
Web Archive 支持 AI 自动标签分类功能。在 Docker 部署时,通过环境变量配置 OpenAI 兼容的 API:
docker run -d \
  -p 8787:8787 \
  -v web-archive-data:/app/service/.wrangler/state \
  -e OPENAI_API_KEY="sk-xxx" \
  -e OPENAI_BASE_URL="https://api.openai.com/v1" \
  ghcr.io/ray-d-song/web-archive:latest
Docker Compose 示例:
services:
  web-archive:
    image: ghcr.io/ray-d-song/web-archive:latest
    ports:
      - "8787:8787"
    volumes:
      - web-archive-data:/app/service/.wrangler/state
    environment:
      - OPENAI_API_KEY=sk-xxx
      - OPENAI_BASE_URL=https://api.openai.com/v1
    restart: unless-stopped

volumes:
  web-archive-data:
NOTE
OPENAI_BASE_URL默认为https://api.openai.com/v1,如使用其他兼容服务(如 Ollamahttp://localhost:11434/v1)需手动指定。- 如需自定义模型映射(将 Cloudflare 模型 ID 映射到实际模型名),可以通过挂载自定义
wrangler.toml实现,详见 node-cf-worker 文档。
如何更新
使用 Docker 部署时,更新只需要重新拉取镜像并重启容器:
docker compose pull && docker compose up -d使用 GitHub Actions 部署时,会自动创建一个 Fork 仓库,更新时只需要执行 Sync fork 即可。
命令部署时,需要下载最新的代码并手动更新。